Basket Preview
Engineered and Solid Wood flooring
Before Installation When your flooring is delivered/collected it needs to be taken into the room where it will be installed, the room will need to be at ‘normal living conditions’ for at least 48 hours before and remain so until 48 hours prior to installation which is when any underfloor heating present must be switched off. ‘Normal Living Conditions’ can be defined as a Temperature between 18-24°C and humidity between 45-50%.
It is important that the flooring is stored correctly to stop any sharp rise or fall in the humidity of the wood, which can have an adverse effect later on. The wood should be stored horizontally and out of its packaging in several small stacks rather than one larger stack. The idea here is to acclimatize the flooring to the room in which it will be going, it is important to keep the planks directly away from the floor either with runners or small battens so air can circulate.
Wooden flooring must never be stored outside, in a garage, on a concrete or cement floor, or anywhere with damp or cold conditions.
When unpacking the flooring from its boxes, look at every board, and inspect for any obvious damage that may have occurred in transport or the manufacturing process. It is also essential that you take a moisture reading both when you unpack the flooring, and at regular intervals up until the time the flooring is laid, this will ensure that the correct moisture levels are being reached, and that an excess in moisture has not occurred which could affect the boards.
If you find that moisture levels are significantly higher or lower than is acceptable, a humidifier or dehumidifier can be used to balance levels. If wooden flooring is going into a new build or full refurbishment all windows and doors must be installed and sealed and all ‘wet trades’ must be finished with the appropriate drying times adhered to. Before any wood flooring installation always check and re-check moisture readings, ensure they are at the required levels, a maximum of 4%, and where necessary a damp proof membrane (DPM) can be installed.
If installing wooden flooring on a ground floor it is advisable to use a DPM even when the subfloor moisture reading is below 4%. It is not recommended that any wooden flooring is installed below ground level, due to the potential of excessive moisture levels, although with proper planning and preparation it can be achievable.
Directly prior to installation it is important that the subfloor is clean, flat, free from any loose debris or dust and structurally sound without any movement. A maximum undulation of 3mm over 3m is generally acceptable.
Due to the vast range of installation issues, we can only offer general guidance on installing your wooden flooring. We always recommend that a professional and accredited wood flooring installer is contacted and instructed to undertake any installations. Where this is not the case, and the DIY route is taken, we recommend that you seek advice from a professional installer to highlight any issues you may have before, during or after installation, money spent here on advice could prove a very wise investment.
Wooden flooring should never be laid in an area where high moisture or humidity could be present such as bathrooms and shower rooms etc.
When your flooring is installed, care should be taken to ensure you are happy with each and every board that is used, whether this means entrusting your installer to lay what they deem acceptable or looking through the boards to ensure you are happy with the overall colour, quality and finish. Any boards that are deemed defective or incorrect can usually be utilised for cuts or under units. Any warped, bowed or curved boards should not be used, but sometimes can be cut for use at the start (or end) of a row. You/your installer should always allow a minimum of 5% extra when ordering to take into account the wastage from cuts, and any defective boards that may be present.
It is good practise to have all the boxes of flooring open so boards can be picked at random to ensure an even spread of the packs, this will make certain that if there are any darker or lighter packs then they will be spread evenly across the floor.
Solid Hardwood Flooring must never be laid over any type of underfloor heating system.
In normal conditions i.e. areas that are not exposed to excessive expansion and contraction, an expansion gap of 15mm must be left around the perimeter of any wooden floor as well as at all doorways and fixed furniture (staircases etc.) to allow for expansion, the larger the floor area the larger the expansion gap that needs to be used. These expansion gaps can be covered with skirting boards or decorative mouldings, or hidden under existing skirting boards, if they are to be undercut as part of the installation. On floors that are over 10 meters in length in any direction an additional expansion joint should be used within the floor area, making sure no run of over 10 meters is ever reached, in most domestic installations, an expansion gap covered by a wooden moulding at the door threshold can be enough to allow sufficient expansion and negate the need for further floor joints in the room itself.
Engineered Wooden Flooring is usually suitable for use with underfloor heating systems, but it is important to always follow the underfloor heating manufacturers’ guidelines. We do not recommend the use of any wooden flooring, either engineered or solid, for use with any type of underfloor heating, and if doing this, you do so at your own risk. We have given advice on best practise, but professional advice from a registered wooden floor installer should always be sought prior to an installation, and always following the underfloor heating providers’ guidelines.
Please note that the manufacturer and/or retailers are not responsible for any costs incurred for the installation, finishing and/or replacement of any flooring installed with obvious defects.
This method is suitable for all solid and engineered hardwood flooring.
Hardwood flooring should not be glued to a chipboard substrate.
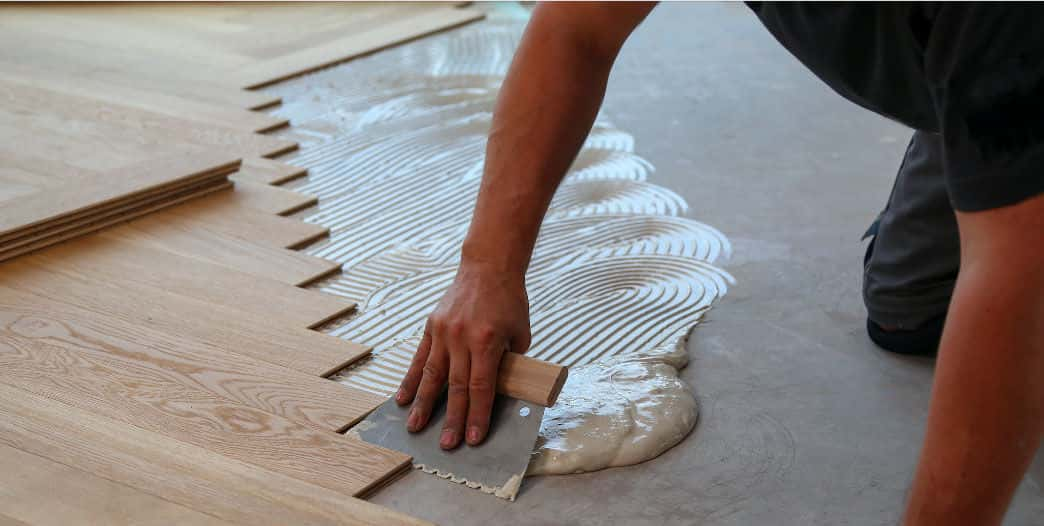
We recommend Rewmar MS polymer flooring adhesive for all glue down installations. This product should be applied with a 6mm deep, 3mm wide V notched trowel and all boards covered with adhesive should be laid within 40 minutes to ensure the correct adhesion to the substrate. The first board should be laid with the groove to the wall and positioned along a chalk line that is the desired distance away from the wall and allowed to set hard before continuing installation. It is very important to leave a 15mm gap around the perimeter and against all vertical surface to allow the floor to move and expand.
On the second row of flooring all edges of the boards will need to be fixed with a continuous bead of PVA based glue. The adhesive should be placed on the upper edge of the groove on the board. Join the boards by placing the tongue into the groove of the previous board. They should now be knocked tightly together with a knocking block to ensure a tight joint. Now continue to install the floor in the same fashion until the whole area is covered, making sure to leave a 15mm expansion gap around all vertical surfaces and across door thresholds.
Insure to clean off any excess glue from the surface of the wood flooring before it has the chance to harden.
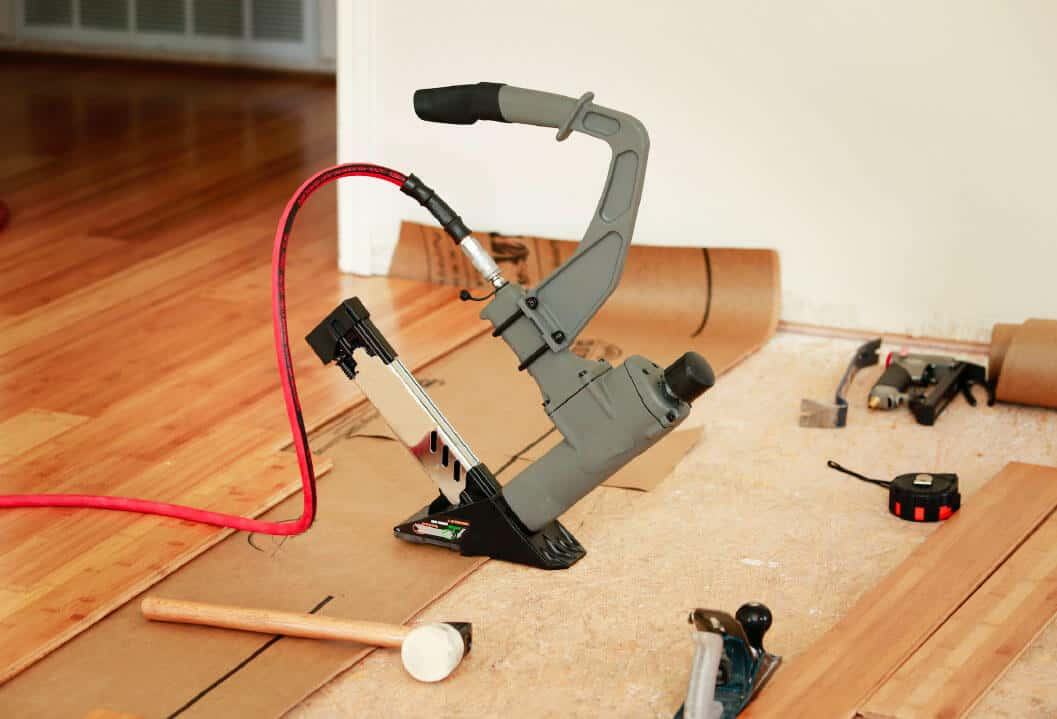
This method of installation is suitable for all solid and engineered flooring of a minimum of 18mm thickness.
Hardwood flooring should not be nailed down to chipboard floors.
When installing hardwood flooring directly onto floor joists, they should be spaced between 300-350mm centres for flooring over 18mm thickness and when using a minimum of 22mm thickness flooring boards the joist can be spaced as much as 400-500mm.
The moisture level of the joists must not exceed 14% at the time of installation. Where the hardwood flooring is to be fixed to ground floor joists, adequate under-floor ventilation and appropriate protection against damp must be provided.
In the case of battens fixed to concrete screed base, the conditions described above should be met. The battens should not be less than 36mm wide and a sufficient depth to accommodate the length of the floor fixing.
The first boards should be laid groove to the wall and should be laid up to a chalk line set to the desired distance from the wall to help to align the following boards. It is very important to leave a 15mm expansion gap around the perimeter and against all vertical surfaces to allow the floor to expand and contract. On the first board, you will be required to nail along the edges through the face of the board every 150mm long the width and 25mm away from the perimeter wall.
Secure the starter board to the subfloor with at least a 35mm long finishing nail, drill pilot holes to take the nails and drive the nails until the heads are just above the board, then sink the nails with a nail set. Either fill nail holes with appropriate coloured wood filler to match the flooring or if possible, cover with scotia or skirting boards.
The second row should be installed by nailing only the edges of the boards on the surface. After this all the boards can be nail through the tongue side of the boards every 250-300mm. The first few rows will normally be nailed by hand and then the heads of the nails sunk below the surface with a nail punch. After the first few rows, the process can be continued using a nailing machine that will put the nails in at a 45-degree angle and sink the heads automatically.
When you have reached the last board, a 15mm expansion gap should be left against the perimeter, and nails should be used on the face of the boards (same as first row) and then either filled or covered with the skirting or scotia.
All boards should only be adjusted using a block and mallet so the edges are not damaged during installation, which can leave unsightly marks to the finished floor.
Always be careful to stagger the end boards of each row by at least 150mm to create a brickwork pattern. You do not want a cluster of joints together as this will look unsightly and will create week areas.
SOME SQUEAKING AND CRACKLING OF THE FLOOR IS NORMAL WHEN USING THE NAIL OR STAPLE DOWN METHOD AND IS NOT CONSIDERED A DEFECT.
IF YOU NEED ANY ADVICE PLEASE CONTACT A MEMBER OF STAFF AT YOUR LOCAL DEPOT, ON ONE OF THE NUMBERS BELOW, WHO WILL BE HAPPY TO ADVISE YOU ON ANY OF OUR PRODUCTS
This method of installation is only suitable for engineered wood flooring.
You will require an underlay on which your floating floor will be laid. This will either be just a foam insulation or foam insulation with a DPM if required. The first board should be laid groove to the wall and should be laid up to a chalk line set to the desired distance from the wall to help align the following boards. It is very important to leave a 15mm expansion gap around the perimeter and against all vertical surfaces to allow the floor to move. You will need to place wedges along the edge of the first row of boards against the perimeter wall, this will stop the first row moving during the installation.
On the second row of flooring, all edges of the boards will need to be fixed with a continuous bead of PVA based glue. The adhesive should be placed on the upper edge of the groove on the board. Join the boards by placing the tongue into the groove of the previous board. They should now be knocked tightly with a knocking block to ensure a tight joint.
Clean off any glue from the surface of the flooring using a damp cloth.
If you are using a click system of boards there is no need for the PVA glue along the joints, the boards will lock together themselves, but care needs to be taken to ensure all boards are fully locked together to stop future movement
When you have completed the wood flooring installation, vacuum thoroughly and clean the floor with a suitable wood flooring cleaner applied to a soft, cloth mop. Then wipe the surface clean to remove loose dirt or soil. Reinstall all skirting boards, scotia’s or mouldings used around the perimeter of the installation. Nail the mouldings into the wall, not the floor. Install any transition pieces that may be required, such as thresholds, reducers, T-mouldings and stair nosing.
KEEP SEVERAL SPARE BOARDS FROM THE INSTALLATION IN THE EVENT OF FUTURE REPAIRS.
It is important to ensure that the room humidity is kept within a range of 45-60% and the temperature at approximately 18 degrees. If the flooring begins to noticeably swell or wave, this will indicate excess of humidity within the room. If spaces begin to appear between the boards, this would indicate that the wood is drying out and there is insufficient humidity. Your heating system may need to be utilised throughout the year to maintain the correct humidity levels.
THIS SECTION IS A GUIDELINE ONLY. CAREFULLY READ THE MANUFACTURER’S INSTALLATION INSTRUCTIONS THAT COME WITH YOUR PRODUCT BEFORE BEGINNING THE INSTALLATION PROCESS.
Cleaning hardwood floors is a simple process when the right products are used. Always try to use recommended wooden flooring cleaning products and do not just rely on a mop that will be forever splashing moisture onto a natural product that loves to soak up water.
Natural Stone & Timber Ltd supply a Wood Floor Cleaning Kit manufactured by Treatex. This consists of a microfibre mop which can be used damp or dry. This mop will actively lift up dirt and grime more efficiently than a traditional mop. The mop pad can be removed and put in a washing machine to clean it. This can be done hundreds of times.
The Wood Floor Cleaning Kit also contains a 1 litre spray bottle of Treatex Spray on Floor & Surface Cleaner. This is ready to use and designed to quickly clean wooden floors especially those treated with Treatex Hard Wax Oil, without making them slippery. The spray contains vegetable oils and carnauba wax so as the floor is cleaned, a thin replenishing and protective layer of wax is also applied. This product is PH neutral and contains no solvents. You should always test this product in an inconspicuous area before cleaning the whole floor to ensure compatibility with the finish of your wood.
You can use the vacuum cleaner for cleaning wooden floors, but you must make sure it has a padded attachment (or pad the head yourself so as not to scratch your floor) and then use it as normal. If you're familiar with carpets in your home, when you first have your new wood floor installed, you'll be amazed at how much dust appears on your floor (usually hidden in your carpet), thus emphasising the extra health benefits of a natural wooden floor. It may require cleaning more often because the dust is more obvious but it’s certainly a lot easier to keep clean than any carpet.
Firstly, give the floor a good sweep with a microfibre mop to collect the dust, dirt, crumbs and other particles into one area of the floor. Brush in the direction of the flooring, especially with micro bevelled flooring and 'brushed' or textured flooring and try to remove any grit beforehand to avoid scratching the surface.
Then use a vacuum cleaner to get rid of the 'dust patches' that you have created and keep the vacuum available - you'll notice that the dust, and especially pet hairs, gather mostly around the perimeter of the room and under furniture, so pay special attention to these areas. Then if necessary, spot clean your floor with a soft cloth and Treatex Floor & Surface Cleaner.
From time to time, depending on your own personal situation and foot traffic, you should clean the entire floor using the Treatex Cleaning & Maintenance Kit.
Some marks will be more stubborn to clean than others but usually the abrasive pad in the Treatex Cleaning & Maintenance Kit will remove them. Be careful not to rub too vigorously or you may wear away the stain, meaning that a more extensive restoration may be required.
Wood is hygroscopic which means that it will absorb and expel moisture according to the humidity levels of the room it is in, or if it comes into contact with water it will expand and if it 'loses' moisture after installation it will contract and sometimes 'cup' towards the drier side, like bacon does under a grill.
Please always remember you are not cleaning the wood boards themselves; you are cleaning the finish that's upon them. Regardless of the protective coating it may have, and no matter how thick and durable it is supposed to be, there's no such thing as a waterproof or scratch-proof wood floor. Water and other liquids can seep into the boards.
There are a variety of easy, inexpensive ways for protecting your wood floor, and because every floor is an investment that can last a lifetime, it is always worth making the effort to do so.
Any spillages or droplets of liquid, no matter how small, should be cleaned up and dried immediately to avoid water marks from appearing. It is important to NEVER use soaking wet cleaning tools or leave standing water on the floor. If you do have some marks that appear from spillages, depending on what the spillages are (water, wine, spirits, coffee etc.), they can usually be removed from an oiled floor by lightly sanding the area without having to re-surface the whole floor. If it is just clear water that has been spilled, sometimes it will dry out after a few days and disappear. However, if a waterline remains after the spillage has completely dried out, the only way to remove this is to sand the floor and re-apply more finish to the area, which can be expensive and disruptive.
Drying the affected area can sometimes be sped up by using an iron set to medium and running this over the area with a clean, dry towel in-between. Other liquids can prove much more troublesome to remove though, so the answer is to prevent spillages or clean them up immediately. Prevention is always better than the cure!
Rugs can be used in places like kitchens and door entries where spills or heavy traffic are most likely to occur. Ensure that damp rugs are not left on your floor and be careful if you have under-floor heating because the floor area beneath the rug can overheat.
Use felt pads on the bottom of legs of chairs and all other furniture to prevent scratches. Keep the pads free of grit and replace as often as needed. Not only will furniture pads protect your floor, it also makes moving your furniture a lot easier for cleaning.
When moving appliances or other heavy items, always place a blanket under the item to protect your floors from scratches and dents. Ensure that service personnel and delivery people do the same.
UV sunlight and direct lighting will change the colour of wood over time, so occasionally rearrange rugs and furniture that block sunlight to the floor beneath, so you don't create a 'patchy' floor. Try to avoid walking on the floor while wearing high heel shoes, or other footwear that may cause indentations or scratches. Although very hard and durable, wood is still a natural product.
Wood flooring can change dimensionally as its surrounding conditions change, so it is worth using a humidifier throughout the winter months to keep wood movement and shrinkage to a minimum, especially when you have installed solid oak.
Take care of your floor and recoat it as needed, depending on wear and tear. If the finish on any part of your floor gets worn down to exposed wood, and it gets even slightly damp, it will stain and require deep sanding for restoration to its former glory.
When and how often you recoat, your floor depends on the wear and tear it receives, along with your personal preferences as a homeowner.
For removing spot marks such as polish, always use a cleaner that is specifically designed for wood flooring because it will clean without affecting the surface finish. Having said that, be careful not to rub the surface too hard and never use anything abrasive or a detergent, without testing a small discrete area first.
Because the surface of your wooden floor is so hard, you won't have the same challenges as you would with a carpet. You should only need to lightly brush the surface or use a vacuum cleaner with a soft fitment to make sure you don't scratch the floor surface, to clean up the dust.
To limit the damage to your floor from grit and dirt, install good quality entrance mats outside the front and back doors for you and your visitors to wipe their shoes on.
See our locations