Basket Preview
Installing Natural Stone Paving
Natural stone paving slabs are premium products and should be installed by an experienced professional landscaping contractor or builder, who will be able to give you guidance on site conditions and provide a suitable installation method tailored to your specific requirements.
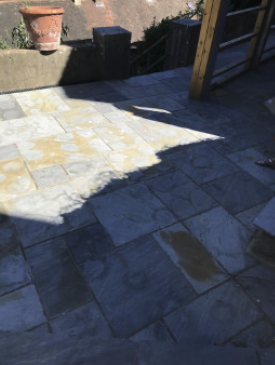
Please NEVER use Acid based cleaner on natural stone products, they will damage the surface of the stone and will cause irreversible damage to your patio (see photo).
When your natural stone paving slabs have been delivered, check them all thoroughly for any breakages or chipping of the edges. Any damaged slabs should be put to one side as these can be used later for cuts and infills.
The depth of the sub-base will vary depending on soil type and site conditions, but generally 100mm of consolidated MOT Type 1 crushed limestone or crushed concrete to the same specification can be used. This will provide sufficient strength for most paving jobs but clay soils and for driveway you will require additional depth up to 200mm. We would also recommend a geo-textile membrane (weed membrane) to be used under the sub-base especially in clay ground conditions, this prevents mixing between substrate and the sub-base.
Some landscape architects or very conscientious landscape contractors will specify a concrete foundation / base, that the paving will then be laid on. This is a very successful method of construction for a sub-base but is generally better left to the professional contractor as mistakes are very hard to correct. If this method is used it is important to prime the concrete surface with two coats of a cement based primer such as Instarmac Pro-prime and you must also use a less porous pointing product such as instarmac flow-point or traditional sand and cement.
An important consideration when excavating for your sub-base is the finished level of the paving. It must be 150mm below the damp proof course or two bricks down.
In most cases your patio should gently run away from the house or any building except where drainage is to be provided. A slope of between 1:80 to 1:100 will be sufficient but depending on the lye of the surrounding land the fall could change. The sub-base should slope at the same rate as the finished level of the patio.
String lines will need to be used to set the finished height of your paving and to determine the falls necessary for the correct drainage of your patio.
For more information follow the below link has some great advice.
https://www.youtube.com/watch?v=eQBNSIOLhiI
It is always good practice to layout your proposed patio by placing the paving slabs across the entire area of the proposed patio. This will help highlight any potential issues with regard to cuts and joint spacing and will also help to confirm you have enough paving to complete the project from what has been delivered, without having to order again later, which can be problematic.
Ensure that you have all the required material to completely the whole project onsite before commencing any work. Open all your crates at the same time, taking material evenly from each of them. This will ensure you have a good distribution of colours across the whole paved area. DO NOT open one crate at a time using all the material before opening the next, this can result in uneven distribution of colours and will look unsightly.
Also ensure, as you lay the paving slabs, that you are keeping to the size mix provided, please ask your local branch for this information if you are unsure.
We would always recommend using a suitable primer on all paving materials both natural stone and man made, but especially on low porosity stones, such as granite, certain limestones paving materials. We would recommend using a product called Instarmac Pro-Prime (link below) which is a cement-based primer which adds adhesion between your bedding material and the paving slab. It is especially advisable to use Pro-Prime on all natural stone on hot days when the bedding materials will dry quickly, this rapid drying can result in the sub base not adhering to your paving, which will allow movement after installation. Pro-prime is available from all Natural Stone and Timber branches.
https://www.instarmac.co.uk/ultrascape-products/pro-prime-slurry-primer/
We always recommend bedding all natural stone paving slabs on a solid mortar bed made with a maximum of 4 parts sharp sand / grit to 1 part cement. But you should always try to match the strength of the bed to the density of the slabs you are installing.
If using a permeable jointing compound such as Easyjoint, a 6 parts sharp sand to 1 part cement bedding mix is recommended to allow for additional drainage.
The use of a plasticiser can help get a more workable consistency to the mix.
Never lay paving on dots and dabs of mortar also known as the five-spot method. This will leave voids under the paying which are prone to movement through freezing and thawing and allows the possibility of discolouration of the slabs and in some cases the slabs can become loose and eventually crack.
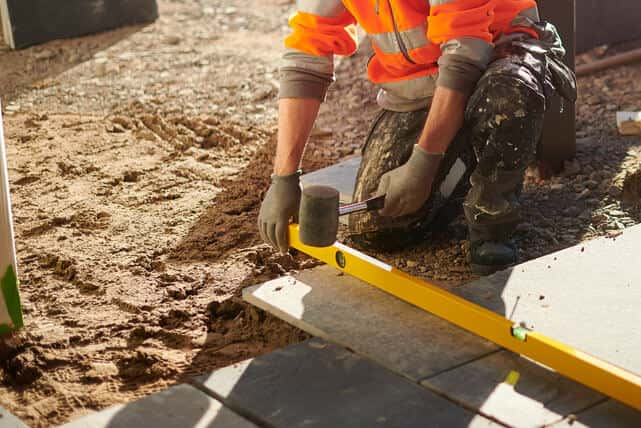
Once you have a well-mixed creamy mortar you are ready to start laying. Spread the mortar mix out evenly onto the desired location allowing additional mixed above the finished level to be the slabs into. Then you can tamp down the ‘wet primed’ porcelain paving paving onto the mortar bed using the rubber mallet. Adjustment will be necessary to ensure that the paving is set in at the desired height and is fully supported with a full bed of mortar. Use a large straight edge with a spirit level repeatedly to check that each paving slabs is set at the desired level and falls that you have set out with your string lines.
When laying natural stone slabs you should work as cleanly as possible, cleaning away any cement or mortar marks immediately, as they can be extremely hard to remove when they have dried.
If you are laying more than one full pack of paving, ensure that you select the slabs from all the different packs at the same time, to eliminate colour banding and to obtain the best colour blend.
On most external paving applications, a 10mm joint is standard, but due to the tolerances with natural stone you can expect + or – 5mm tolerance on these widths. Manufactured products such as porcelain paving have a tolerance of + or – 2mm so a much tighter joint of between 3-10mm can be achieved. On any joint below 5mm and external grout should be used, but please consult with your contractor before purchasing to insure you are buying the correct product for your paving.
All joint should be adjusted as the paving is laid with trimming of slabs occasionally needed to help keep lines straight and the pattern running true.
Always use a diamond blade for natural stone on a grinder, petrol cutter or table saw.
Please see list below giving some points on the successful cutting of natural paving:
1. Score/shallow cut along the length of the cut first.
2. Make tension relief cuts at both ends, cutting through the whole thickness of the slabs and at least 50mm into the cut.
3. Minimum pressure, let the blade do the cutting.
4. Keep the saw at low revs after the first scoring cut.
5. Try to use water to keep the slab and blade cool.
6. Work slowly doing multiple cuts until you gradually complete the cut, do not try to complete the cut in one pass.
If you are cutting using a grinder, you must ensure that the slabs you are cutting are fully supported and firmly bedded before you undertake any cuts. You can use a good wooden pallet with either a rubber mat or piece of carpet to add this support.
There are a few standard ways to point your paving, traditionally your landscaper would use sand and cement mortar, this method can be highly successful if undertake correctly and cleanly by an experience contractor. In recent years resin-based point products such as Azpects Easy Joint (link below) have come onto the market, these products save lots of back breaking work and labour costs and can be good for the DIYer.
We would also recommend a product call Instarmac Flowpoint (link below) this is a cement-based product used by commercial ground working contractors but can be used by experienced landscapers, this product gives a superior finish to mortar pointing and Easy Joint and is completely frost hardy and will last for many years. This product is not an easy product to use and is not recommended for use by anyone without the correct experience.
https://www.azpects.co.uk/products/easy-joint.aspx
https://www.instarmac.co.uk/ultrascape-products/flowpoint-rapid-set-flowable-grout/
It is always advisable to seal natural stone paving products, this helps reduce the chances of staining and helps reduce the maintenance required after installation. With natural stone we would always recommend using a water based impregnating sealer such as Universeal Hydroseal or Ultimate Stone Enhancer.
Please ensure that the area to be sealed is completely clean, dry, free from debris and surface staining and that you have atleast 24 hours of dry weather ahead.
Application guidance is available on the bottles must always be always followed to ensure success application. From more information on these products please use the link below.
IF YOU NEED ANY ADVICE PLEASE CONTACT A MEMBER OF STAFF AT YOUR LOCAL DEPOT, ON ONE OF THE NUMBERS BELOW, WHO WILL BE HAPPY TO ADVISE YOU ON ANY OF OUR PRODUCTS.
See our locations